CURSOR
For every SQL statement execution certain area in memory is allocated. PL/SQL allow you to name this area. This private SQL area is called context area or cursor. A cursor acts as a handle or pointer into the context area. A PL/SQL program controls the context area using the cursor. Cursor represents a structure in memory and is different from cursor variable.
When you declare
a cursor, you get a pointer variable, which does not point any thing.
When the cursor is opened, memory is allocated and the cursor structure
is created. The cursor variable now points the cursor. When the cursor
is closed the memory allocated for the cursor is released.
Cursors
allow the programmer to retrieve data from a table and perform actions
on that data one row at a time. There are two types of cursors implicit
cursors and explicit cursors.
Implicit cursors
For
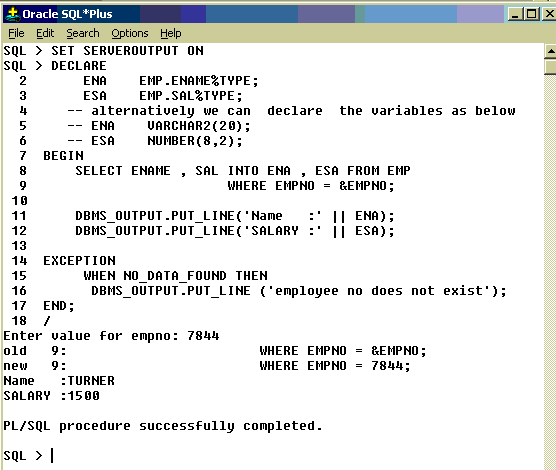
SQL queries returning single row PL/SQL declares implicit cursors.
Implicit cursors are simple SELECT statements and are written in the
BEGIN block (executable section) of the PL/SQL. Implicit cursors are
easy to code, and they retrieve exactly one row. PL/SQL implicitly
declares cursors for all DML statements. The most commonly raised
exceptions here are NO_DATA_FOUND or TOO_MANY_ROWS.
Syntax:
SELECT ename, sal INTO ena, esa FROM EMP WHERE EMPNO = 7844;
Note: Ename and sal are columns of the table EMP and ena and esa are the variables
used to store ename and sal fetched by the query.
Explicit Cursors
Explicit
cursors are used in queries that return multiple rows. The set of rows
fetched by a query is called active set. The size of the active set
meets the search criteria in the select statement. Explicit cursor is
declared in the DECLARE section of PL/SQL program.
Syntax:
CURSOR <cursor-name> IS <select statement>
Sample Code:
DECLARE
CURSOR emp_cur IS SELECT ename FROM EMP;
BEGIN
----
---
END;
Processing
multiple rows is similar to file processing. For processing a file you
need to open it, process records and then close. Similarly user-defined
explicit cursor needs to be opened, before reading the rows, after
which it is closed. Like how file pointer marks current position in
file processing, cursor marks the current position in the active set.
Opening Cursor
Syntax: OPEN <cursor-name>;
Example : OPEN emp_cur;
When
a cursor is opened the active set is determined, the rows satisfying
the where clause in the select statement are added to the active set. A
pointer is established and points to the first row in the active set.
Fetching from the cursor: To get the next row from the cursor we need to use fetch statement.
Syntax: FETCH <cursor-name> INTO <variables>;
Example: FETCH emp_cur INTO ena;
FETCH statement retrieves one row at a time. Bulk collect clause need to be used to fetch more than one row at a time.
Closing
the cursor: After retrieving all the rows from active set the cursor
should be closed. Resources allocated for the cursor are now freed.
Once the cursor is closed the execution of fetch statement will lead to
errors.
CLOSE <cursor-name>;
Explicit Cursor Attributes
Every
cursor defined by the user has 4 attributes. When appended to the
cursor name these attributes let the user access useful information
about the execution of a multirow query.
The attributes are:
- %NOTFOUND:
It is a Boolean attribute, which evaluates to true, if the last fetch
failed. i.e. when there are no rows left in the cursor to fetch. - %FOUND: Boolean variable, which evaluates to true if the last fetch, succeeded.
- %ROWCOUNT: It’s a numeric attribute, which returns number of rows fetched by the cursor so far.
- %ISOPEN: A Boolean variable, which evaluates to true if the cursor is opened otherwise to false.
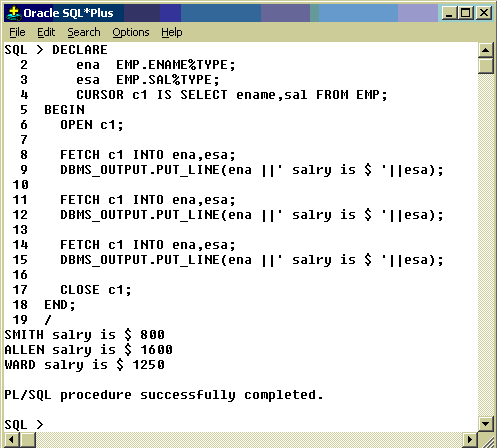
In
above example I wrote a separate fetch for each row, instead loop
statement could be used here. Following example explains the usage of
LOOP.
Using WHILE:
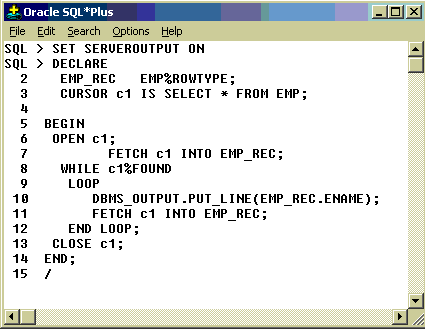
While LOOP can be used as shown in the following example for accessing the cursor values.
Example:

Fetch is used twice in the above example to make %FOUND available. See below example.
Using Cursor For Loop:
The cursor for Loop can be used to process multiple records. There are two benefits with cursor for Loop
1. It implicitly declares a %ROWTYPE variable, also uses it as LOOP index
2.
Cursor For Loop itself opens a cursor, read records then closes the
cursor automatically. Hence OPEN, FETCH and CLOSE statements are not
necessary in it.
Example: 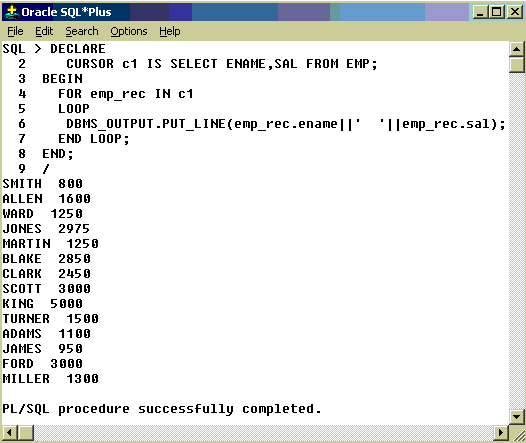
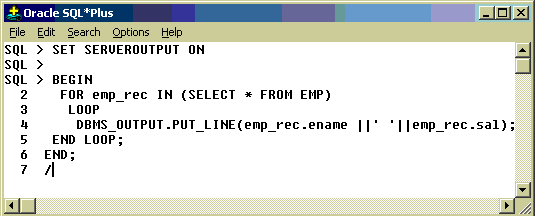
emp_rec
is automatically created variable of %ROWTYPE. We have not used OPEN,
FETCH , and CLOSE in the above example as for cursor loop does it
automatically. The above example can be rewritten as shown in the Fig ,
with less lines of code. It is called Implicit for Loop.
Deletion or Updation Using Cursor:
In
all the previous examples I explained about how to retrieve data using
cursors. Now we will see how to modify or delete rows in a table using
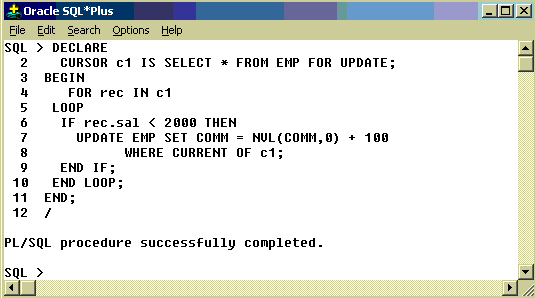
cursors. In order to Update or Delete rows, the cursor must be defined
with the FOR UPDATE clause. The Update or Delete statement must be
declared with WHERE CURRENT OF
Following example updates comm of all employees with salary less than 2000 by adding 100 to existing comm.
0 comments